One easy way to take your auction from a mess to a success is through proper management of your auction items. There’s nothing worse than going through checkout to find another guest accidentally picked up the item you were claiming. As you can imagine, this makes for a bad auction experience. Part of auction management that can’t be overlooked is managing your auction items. Item security, accurate auction item descriptions, and even the way items are displayed can encourage increased bidding and confidence in your auction fundraising event.
What is auction item management?
A key aspect of auction management, auction item management is the practice of collecting, storing, securing, and relinquishing auction items. Organizations ranging from nonprofits hosting auction fundraisers to large auction houses like Sotheby’s and Heritage Auctions all have their own item management processes and procedures they follow to ensure the safety of the items and the satisfaction of bidders. That’s why your nonprofit needs its own auction item management policies. Otherwise checkout might wind up looking a little like this:

How to collect auction items
When it comes to collecting auction items, the first step is to think about what your audience would appreciate. If your auction has a theme, be sure to incorporate themed items into your search as well. The most important thing about your auction items is that they should appeal to your attendees. You can survey supporters or see what other nonprofits have sold successfully. Then build a want list of items to go for. Stumped as to what packages to put together? Consider these great auction item ideas.
With that list, reach out to local businesses that carry the items that appeal to your desired audience.
As you collect auction items, be sure to transport them to a secure location. Handle high value, fragile, and heavy items with a team if possible. After all, a large antique armoire will require a small army to move. Not only does this prevent injuries among staff and volunteers, this practice also eliminates the risk of expensive damages or theft. Be sure that the secure location to store the items has a lockable door with controlled access to the room. An underused conference room at your nonprofit can be perfect for this purpose.
When you’ve secured the items, send a thank-you note to item donors.
Write item descriptions and take photos as items come in

Don’t wait to photograph items all at once. This can take a lot of time and put you behind in previewing what’s available at your auction. Instead, as items come in, take time to photograph the items and write the description of the item if one wasn’t provided by the donor.
An easy way to start with item descriptions is to use the language that describes the item on its packaging. If the manufacturer shared measurements and other helpful details, you can pull that information from the packaging and type it up in the description.
For items without packaging, it may help to conduct some research (but be sure not to make claims without backing) before describing the item. After that, describe the item in detail.
Accuracy is important, but don’t forget to have fun writing these descriptions. The descriptions should excite readers and get them excited to place their bids. So dust off your creative genius cap and write your descriptions with fun in mind.
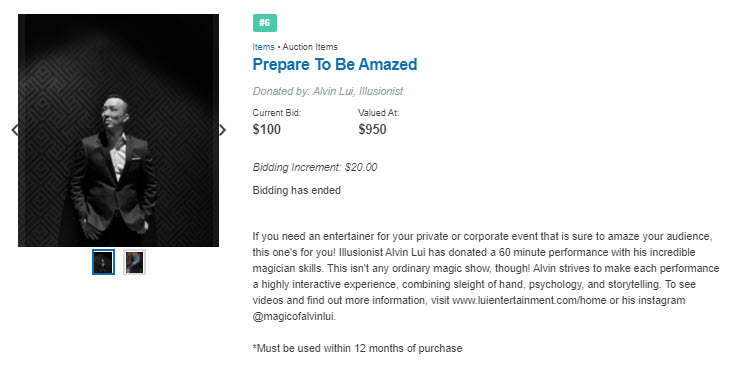
91 Place hosted a self-care silent auction and their item descriptions were on point. Just check out this great description for an illusionist who donated his time so bidders could win a 60-minute performance for their own events.
When it comes to the item photos, you want these to match the quality of your descriptions. Take time to stage items and take photos in good lighting. You’ll want the photos to be as consistent as possible while highlighting the best features of the items you’re selling.
Larger items may require outdoor photos. Be sure to blur backgrounds so that the focus remains on your item and not what’s going on around it.
For more handy tips on item descriptions and photos, check out Qgiv’s Auction Planner.
Secure your auction items
Another important step for managing auction items is securing the auction items. We alluded to this earlier, but to avoid damaged or stolen goods your auction items should be secured in a controlled location with a lockable door. Here are some other helpful tips for keeping your auction items secure until they’re ready to be distributed to winning bidders.
It’s not enough just to lock the door when not in there, it’s important to control access to the space. Grant only those who need access to the items access to that room. Plus, if an item needs to be removed from the room, you should create a sign in and out sheet that is held by your auction manager to track when items have left the room, who has it, and why.
Reasons an item may need to be temporarily removed include for appraisals, to write the item description, or to take the listing photos. There should be very few reasons an item is authorized to leave the secure item area.
Develop a plan for staging auction items
During your event, your audience will be more likely to bid on items if they look good. For virtual events, you may get away with leaving all the items in a secured area and arranging for pickup or delivery after the event. That means you’re relying on your photos to make the items look good. And there’s nothing wrong with that!
However, for hybrid or in-person events, the ability to see the items in person could help drive bids from in-person guests. In this case, you want to stage the items as attractively as possible. Your item table should be on your auction management checklist. The appearance of the items, the order they’re displayed in, and their descriptions should be accessible to all of your guests. It helps to appoint auction item experts to man the table. They’ll answer questions and restage items after they’re picked up and inspected by potential bidders.
It’s important to keep small, high value items secure during this phase of the event. Event tickets, jewelry, and more should be secured until it’s time to award the items to the winning bidder. This prevents crime or lost items during the event. Instead, prepare manila folders and place the high value item inside of it until it’s time to disburse the won items.
Determine how winning bidders get their items

When bidding ends and checkout opens, you need to be able to get winning bidders processed quickly. This means getting them the items they’ve won or arranging pickup or delivery of their items.
Avoid people walking off with the wrong items. Develop policies and procedures for determining when items are releasable. This manual keeps items from being given away accidentally or walked away with intentionally.
The safest way to get items to bidders is offering pickup or delivery of items after the event. This way, you can clearly see who won and paid for the item before releasing it. That said, if you want to give the items to the winner at the event, the right auction management software can help. A checkout process that provides bidders with an itemized list helps everyong get the right auction items.
Final thoughts
Protect your auction items and your nonprofit’s reputation by making item management part of your auction management process. You need to know how to properly collect and secure donated items, how to describe and stage them perfectly, and arrange for accurate release of items when the event ends. With these ideas in mind you’ll be able to manage auction items like a pro.
Need auction management software?


